Wild Screech Owls nest and sometimes roost in old tree hollows. These little nooks provide protection from predators and shelter from the elements. Unfortunately, as older trees are cut, fewer hollows are available for these small owls and they resort to roosting (not breeding) in the open. A Screech Owl roost box is easy to construct, set up and maintain. There are many different designs available for these shelters, but we have found that the following design is simple and effective enough for our purposes. Keep in mind that this is a roost box. It is not designed as a breeding box.
To start:
A drill, saw, hammer and
screwdriver are all required for this project.
You will need a sheet of plywood 3/8" thick to cut the design from.
Wood glue is optional, but small roofing nails are a must.
You will also need a hinge for the swinging door (with screws) and a short
(2" x 1/2" x 1/2" or so) block of wood to screw in under
the door. This will rotate around the center screw so that it can keep
the door closed.
5 screws should be enough. Have a lot of nails on hand.
Lastly, you'll need a small amount of pine needles (a few handfuls).
Cutting the pieces:
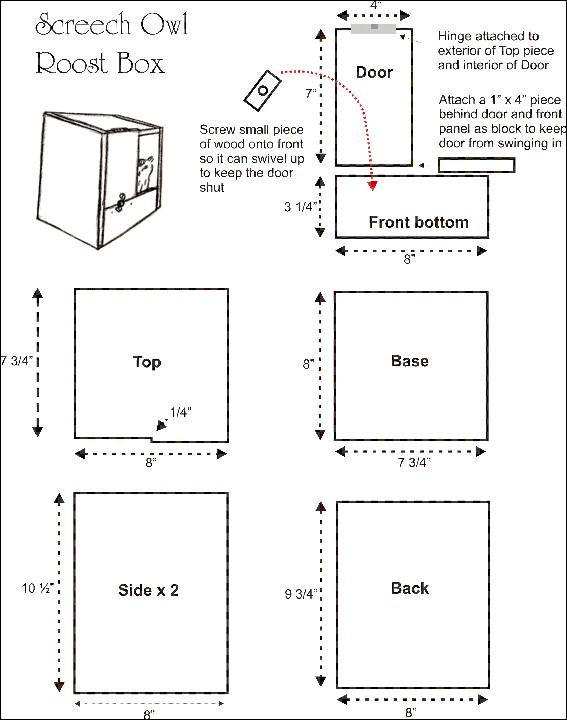
Use the following drawings to cut each piece of the box.
Putting the box together:
The sides of the box are the full depth and height. The top, bottom and back pieces are held flush between these side pieces for nailing. The notch made for the door in the Top piece can either be placed to the right or left of the front (in the drawings it is placed to the left). Generally this depends on how the box will ultimately be positioned. Make sure the bottom piece is flush with the back of the unit. It will not extend all the way to the front as this is where the front bottom piece will insert.
Before placing the front bottom piece into place, nail or screw the 1" x 4" piece to the backside where the door will meet. Ensure that 1/2" is extending beyond the upper edge so that the door will not be able to swing into the cavity.
When the six sides above have been nailed together you can move on to the door. Attach the hinge to the inside upper edge of the door. Fit it into the slot cut in the box's roof piece. Screw the other side of the hinge into the top of this wood.
Finally, attach the wooden catch just below the door with a screw so that it can rotate around - keeping the door shut, or allowing the door to open. This will allow you to clean the box easily if required.
Box Placement:
Attach the box securely
to a tree at least 10 feet off the ground and facing away from the prevailing
wind and out of direct sunlight. Once the box is hung securely, line the
bottom with a 1/2" - 1" thick layer of pine needles.
Alternative Nesting Box
Coming soon!
Contact
Us | Hours | Home
| Legal
© 2010 The Owl Foundation